

How Do I Add an Administrator to My Domain_6 Account
Add users to your organization
After Domain Verification, you can start adding users to your organization. You can choose to add users one at a time or use the CSV file option to add up to 200 users at once. You can also import users to Zoho Mail from Google Workspace or other Zoho services like CRM.
Table of Contents
- Create a new user
- Additional fields
- Auto-disable user
- Zoho People fields
- Invite Users
- Import using .csv file
- Import users from Google Workspace
- Import users from Zoho CRM
- Import users from other Zoho Services
- User Provisioning from Active Directory
- Troubleshooting
- Deleting Users
Create user
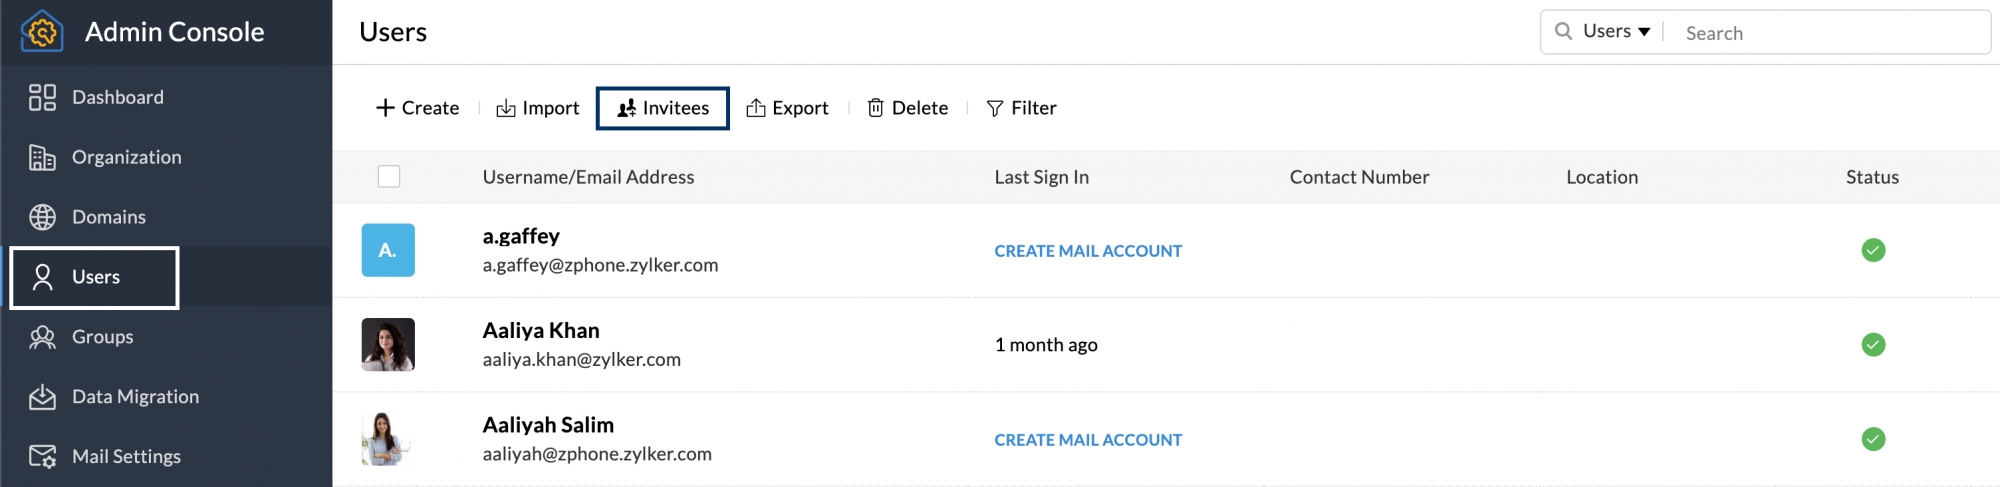
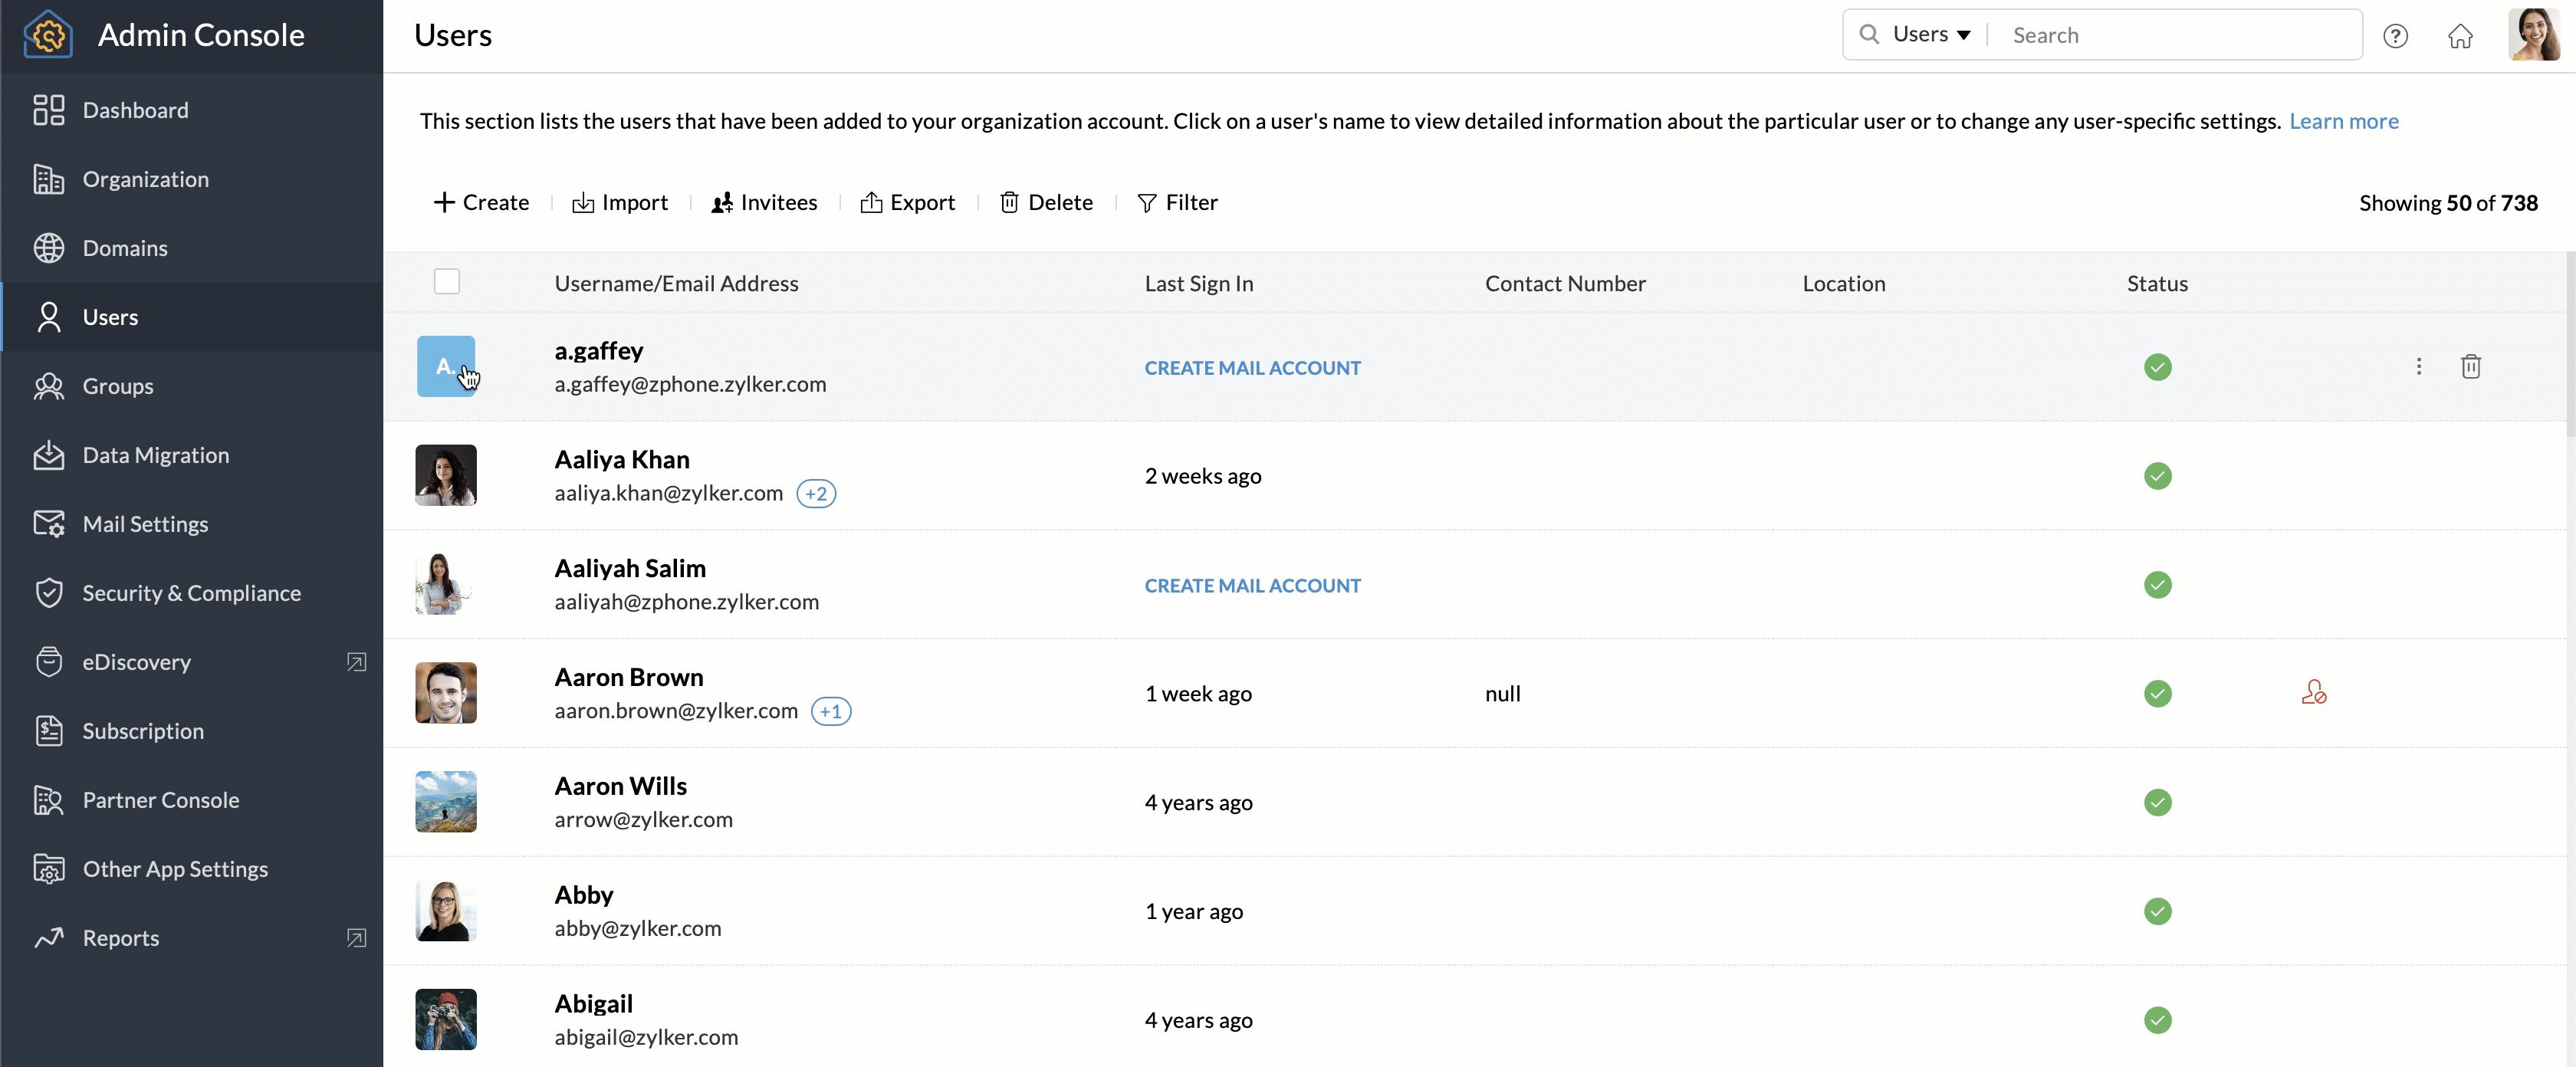
- Login to Zoho Mail Admin Console
- Navigate toUsers in the left pane.
- In the user listing page, click Create
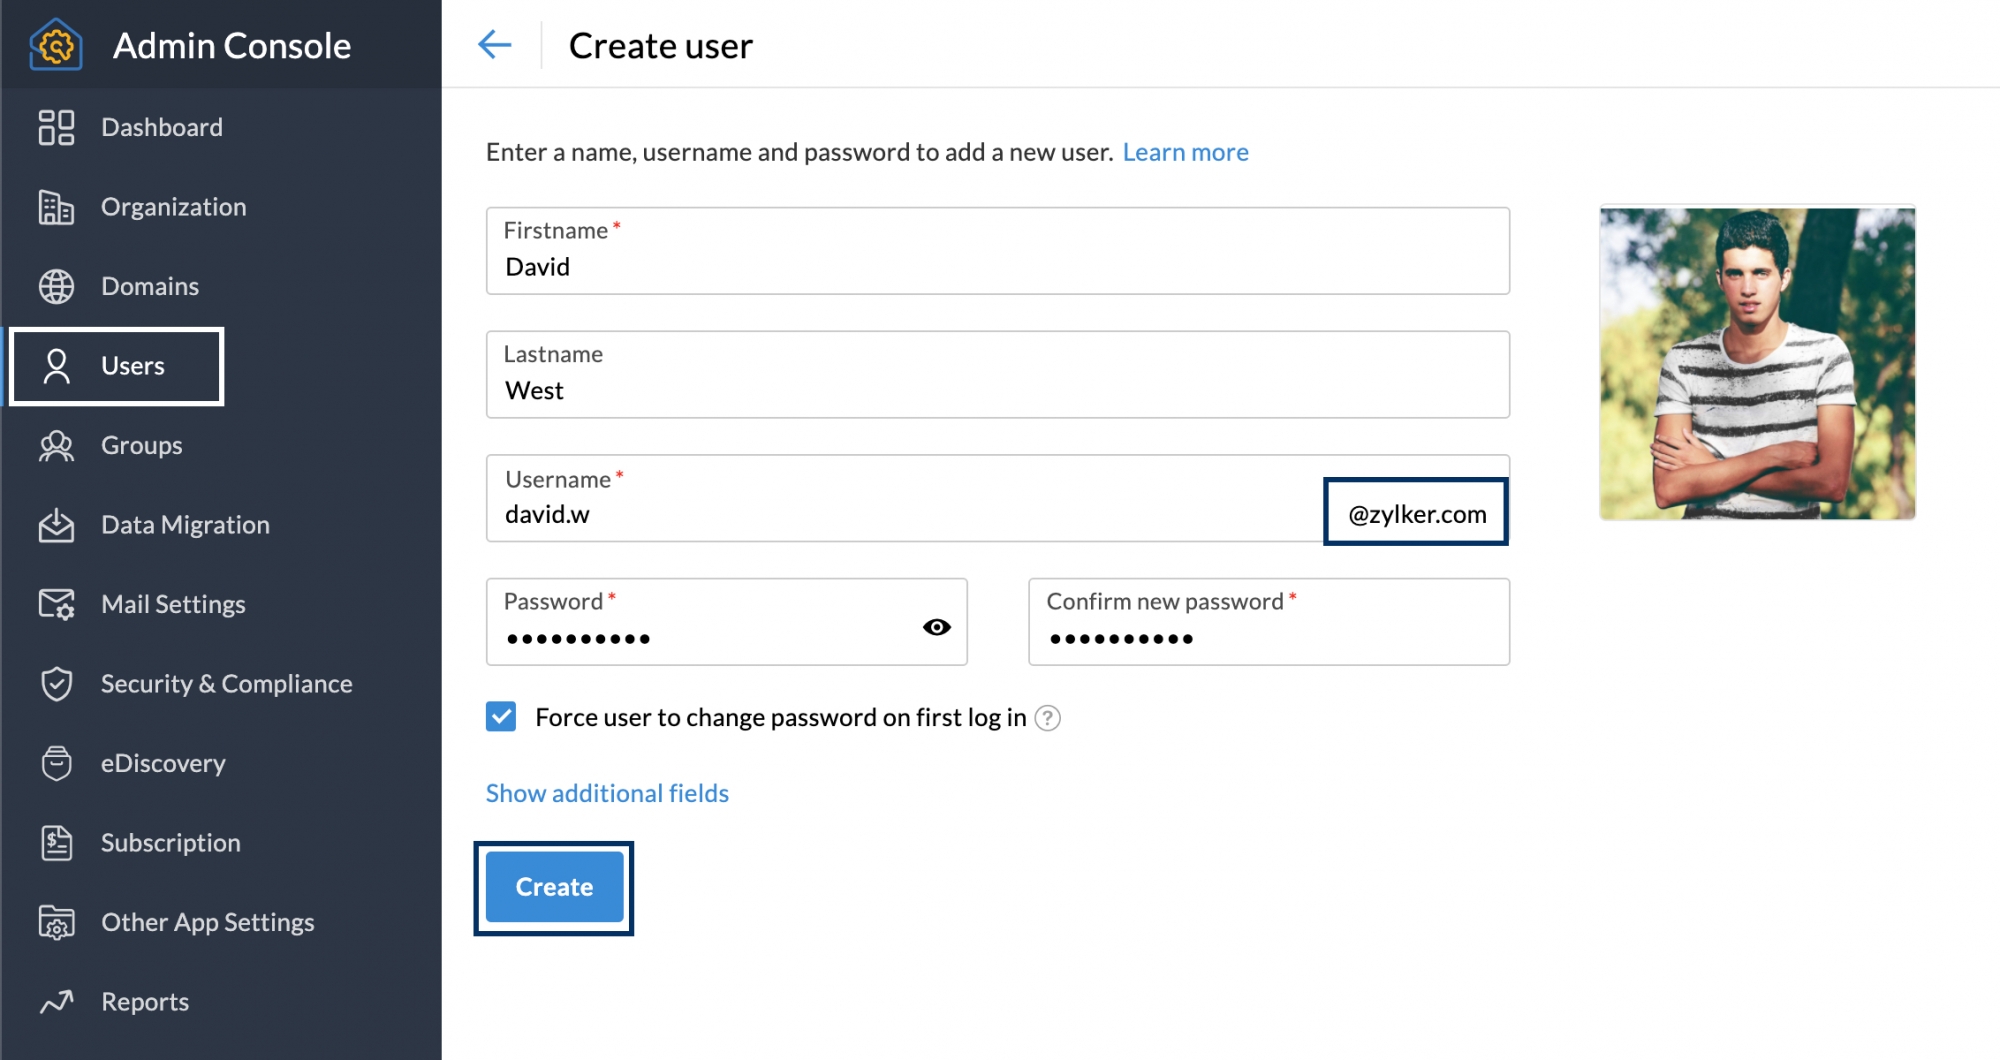
- Enter the user's first name, last name in their respective fields.
- The username will get filled automatically based on the Preferred Email Format set. If you prefer any other username from the suggestion, you can edit the Username field.
- If you have added multiple domains in your organization, you will have a drop-down where you can select the domain for the user address to be associated with.
- Provide a password for the user. The password must have a minimum of 8 characters, with one numeric character and one special character. Make sure the user receives this password, as they will need it to log in to their account.
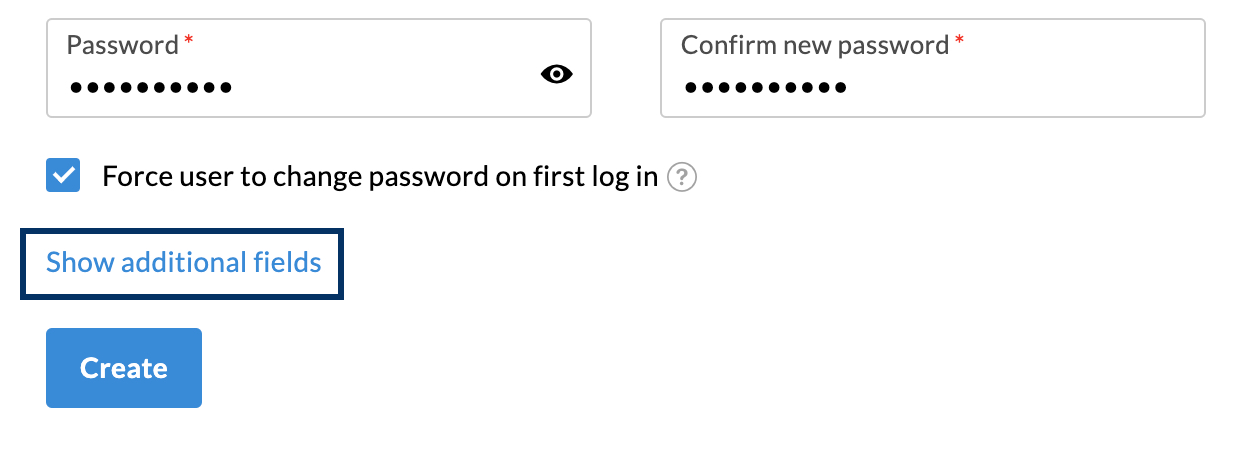
- Check the Force user to change password on first login option to prompt the user into changing the password set by admin during his/her first login. If you check this option, users will not be able to access their mailbox before changing their password.
- You also have an option to upload a profile picture for the user.
- ClickShow additional fields for advanced user settings. If don't want to associate the user with any groups or email policy for the user, you can skip this step. If you want to configure the same, refer below.
- Once done, click Create.
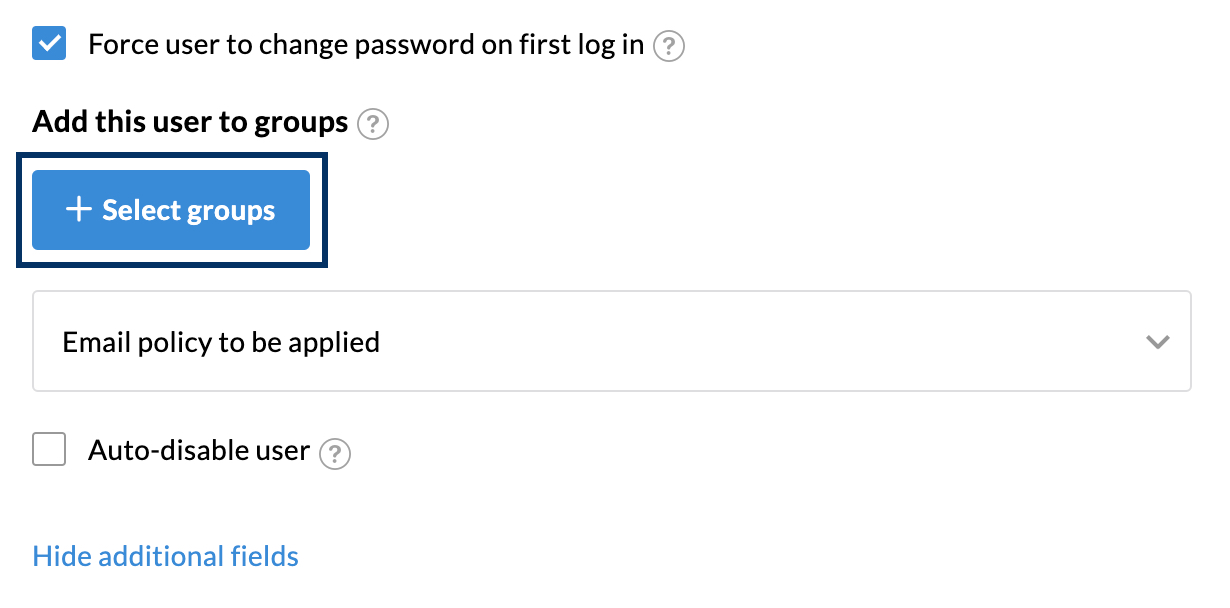
In theShow additional fieldssection, you have options to associate the user with any groups in your organization, apply email policy, and auto-disable user.
- Click Show additional fields to expand advanced user settings.
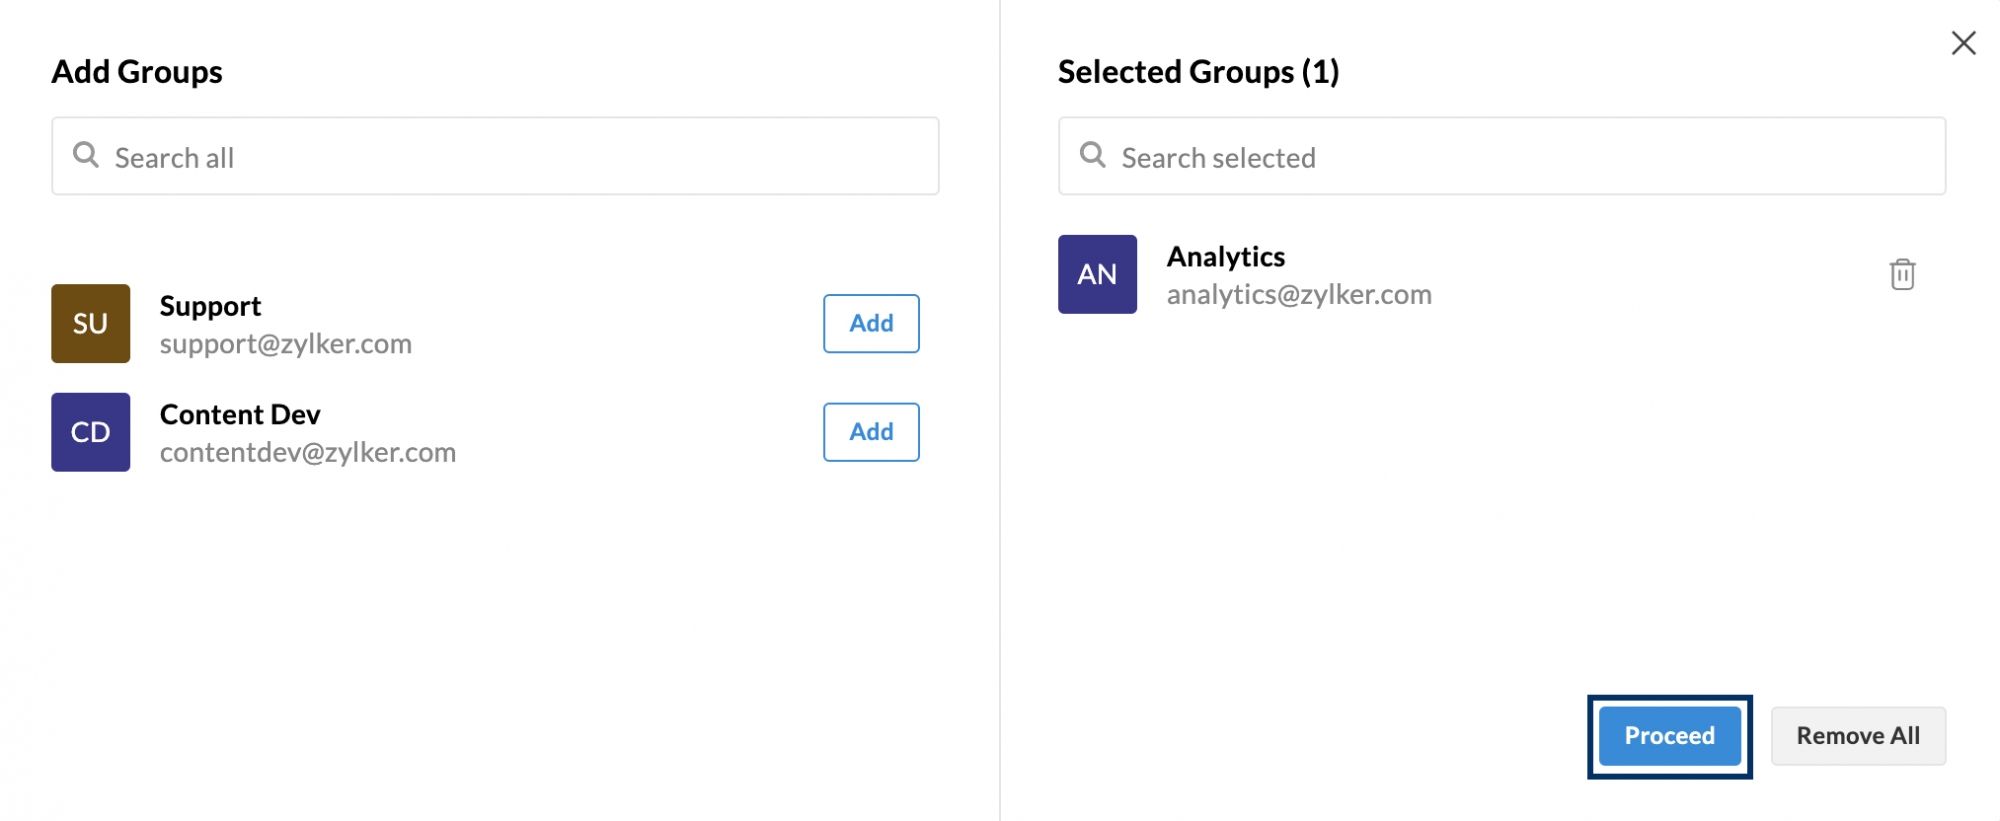
- To associate the user with any group,
- Click Select groups.
- In the pop-up, find the groups you want to add the user to and click Add. You will notice the group moving to the Selected Groups section.
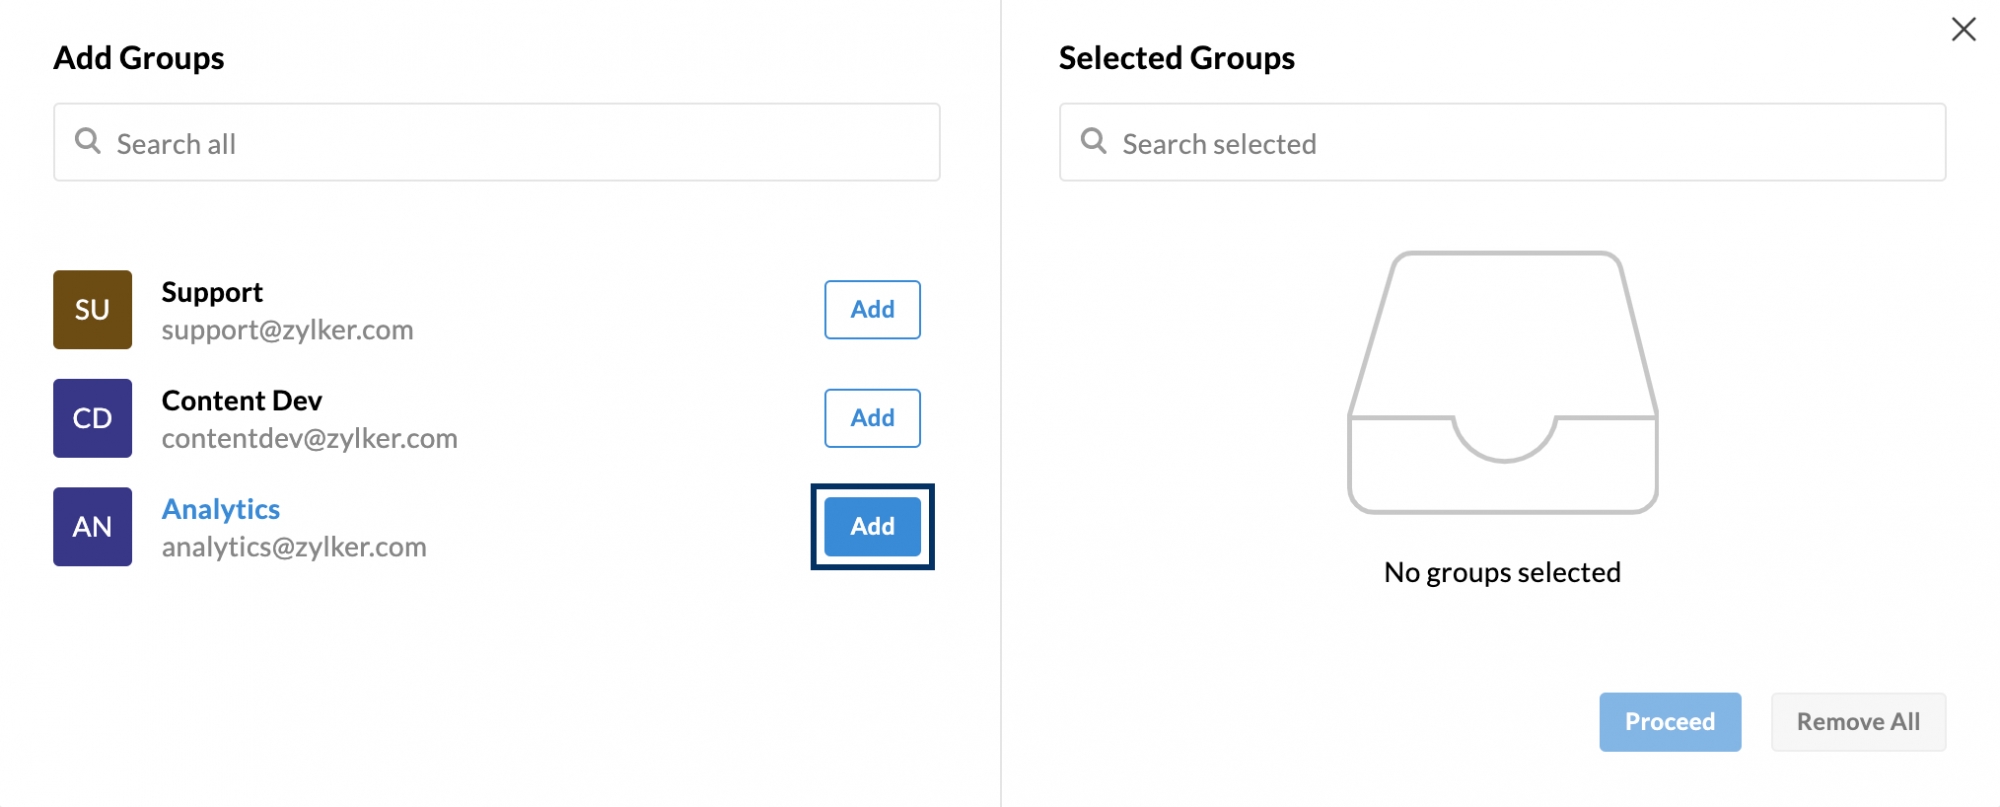
- You can add the user to more than one group. If you want to delete any group from the selected group section, click the delete icon.
- After adding all the groups of your choice, click Proceed.
- Click Select groups.
- To apply email policy to the user, click theEmail policy to be applied dropdown and choose the policy you want to associate the user with.
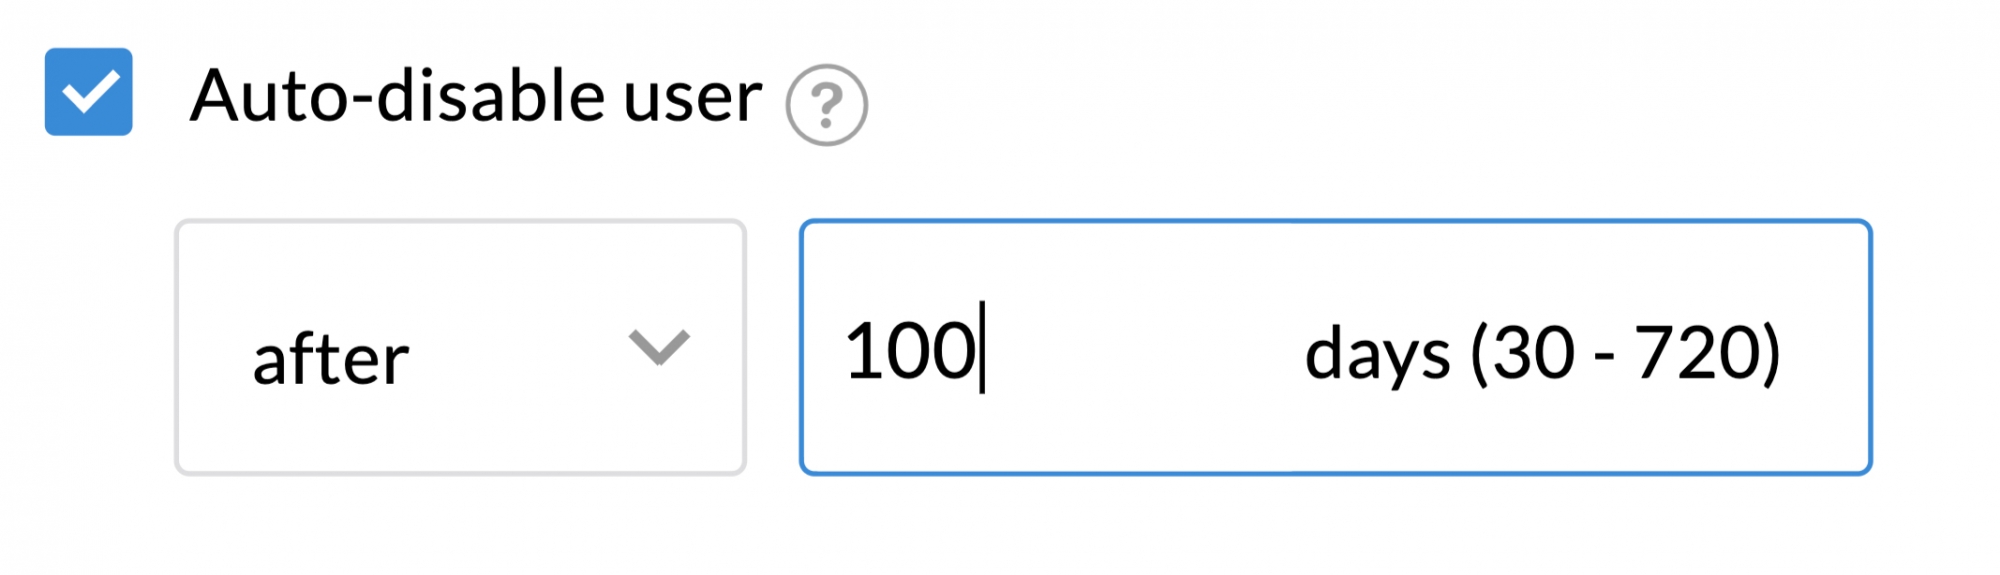
- You can choose to disable a user automatically with the help of theAuto-disable user option. This option is particularly helpful when you create accounts for contract employees. To Auto-disable user,
- Check theAuto-disable user option.
- You can choose to disable the user account either after a particular number of days (30 to 720) or on a specific date.
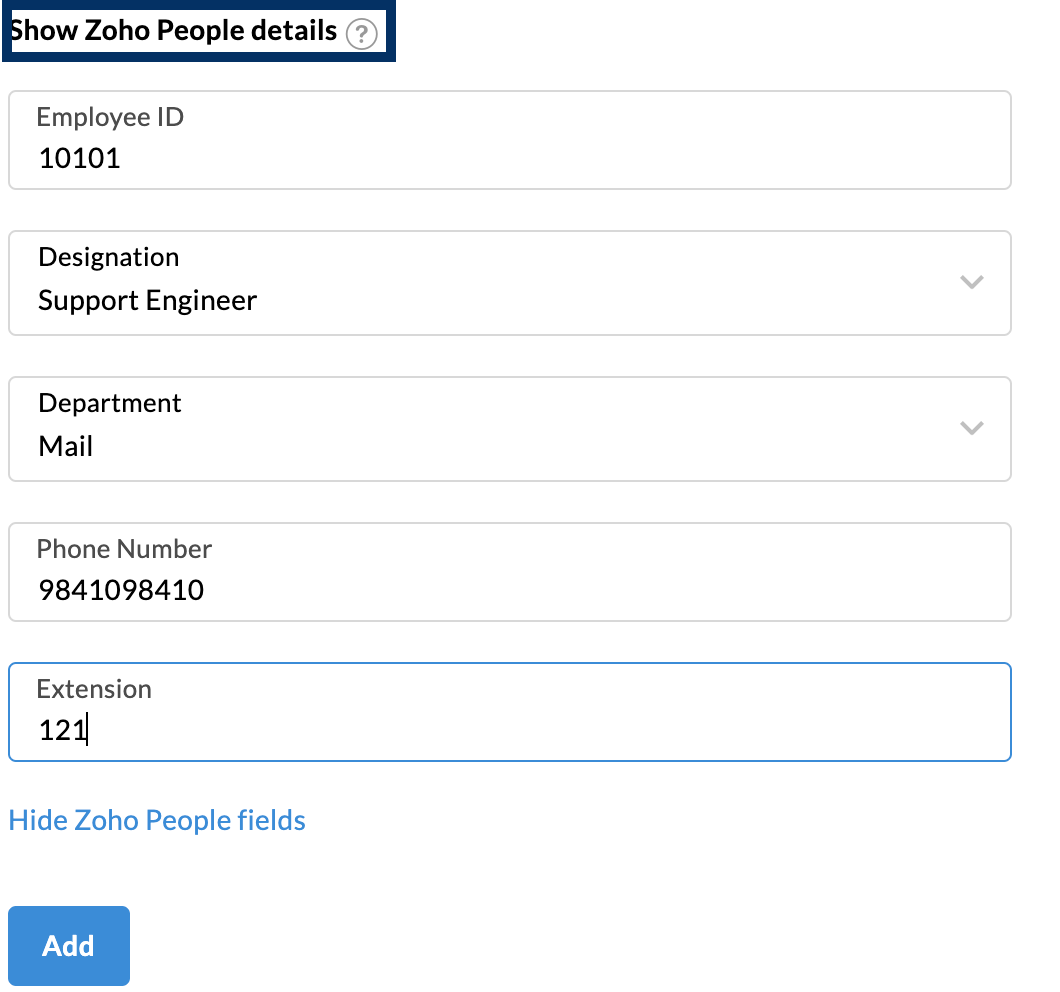
Clicking on Show Zoho People details lists a set of rows that are present in Zoho People. Zoho People is an online Human Resource Management System designed to manage and access all your employee data from a centralized location. To learn more about Zoho People, click here.
The information entered in these rows will automatically be captured and populated in there. Thus, you don't need to fill the same information again in Zoho People.
While the Employee ID, Phone number, and Extension needs to be filled out individually for each user, the Designation and the Department can be created and added. Once they've been successfully added, you need to only select a user's department and designation from the drop-down. You can create the required designations and the departments when you are creating the super administrator and add new ones later if necessary.
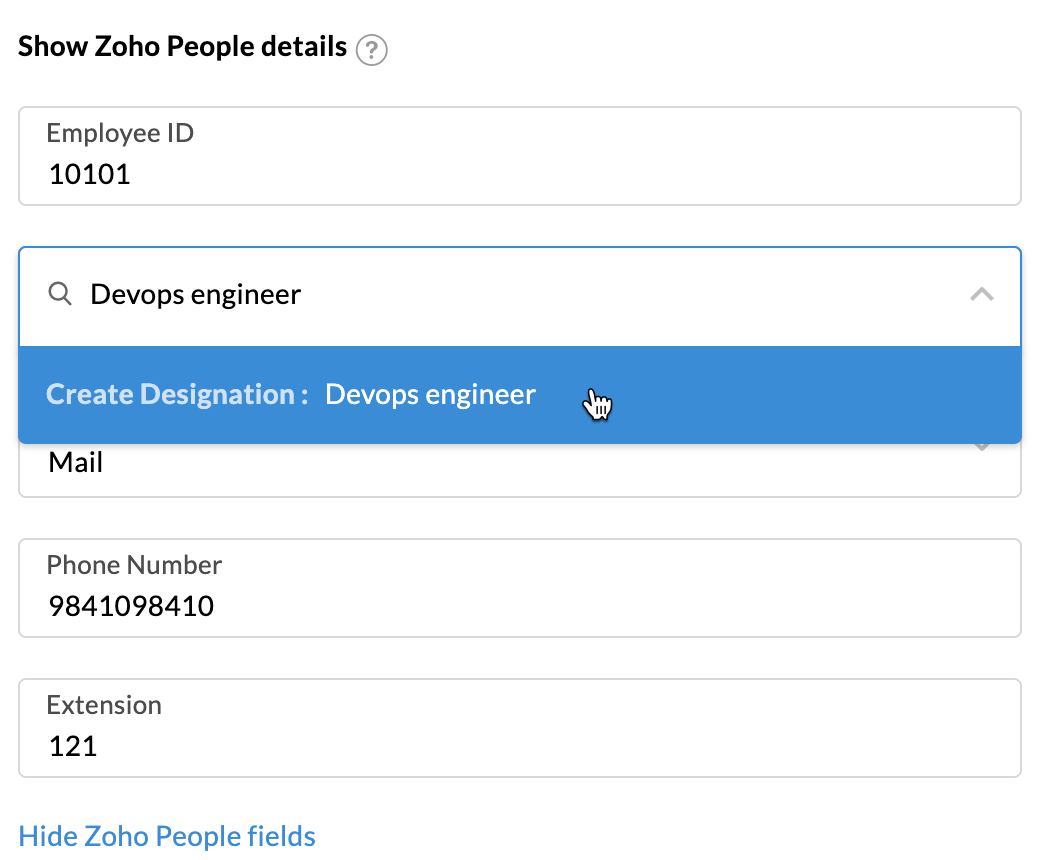
To create and add the designation and the department,
- Click on Show Zoho People details.
- In the Designation row, type in an existing designation of your organization. (For example, a designation can be Human Resources - Operations).
- Click Create Designation below the row. Now the designation is added and you can select it from the drop-down).
- Repeat the same steps in the Department row to create departments.
When you create new users, enter their employee ID, phone number, extension, and choose their designation and department from the drop-down. The information that you fill in the Zoho People fields will automatically be captured and populated in Zoho People.
Note:
- You will not be able to use email addresses such asabuse@domainname.com and postmaster@domainname.com as individual accounts or aliases for individual accounts. These email addresses will be used to report spam incidents. However, you can create Groups named abuse and postmaster and add yourselves as members of the Group.
- When you create a user, they will be able to login to their account and send emails immediately. However, they will not receive any emails until the domain's MX entries are pointed to the Zoho Mail servers. The domain's MX Records can be cross-verified at Zoho's MX record checker tool.
- The Show Zoho People details option can be used by our paid users only.
Invite users
You can request users to join your organization with the help of the Invite users option. After you invite a user by entering their email address, an invitation will be sent to the same email address. Once the user accepts the invitation, the user will be added to your organization. You can also invite users whose email addresses are with an email provider other than Zoho.
But, if a user already has a business account with Zoho, they won't be able to join your organization. In this case, the user will have to remove their existing organization from their account.
Note:
The option to Invite users will only be available for organizations with a paid plan.
- Login to Zoho Mail Admin Console
- Navigate toUsers in the left pane.
- In the user listing page, click Invitees
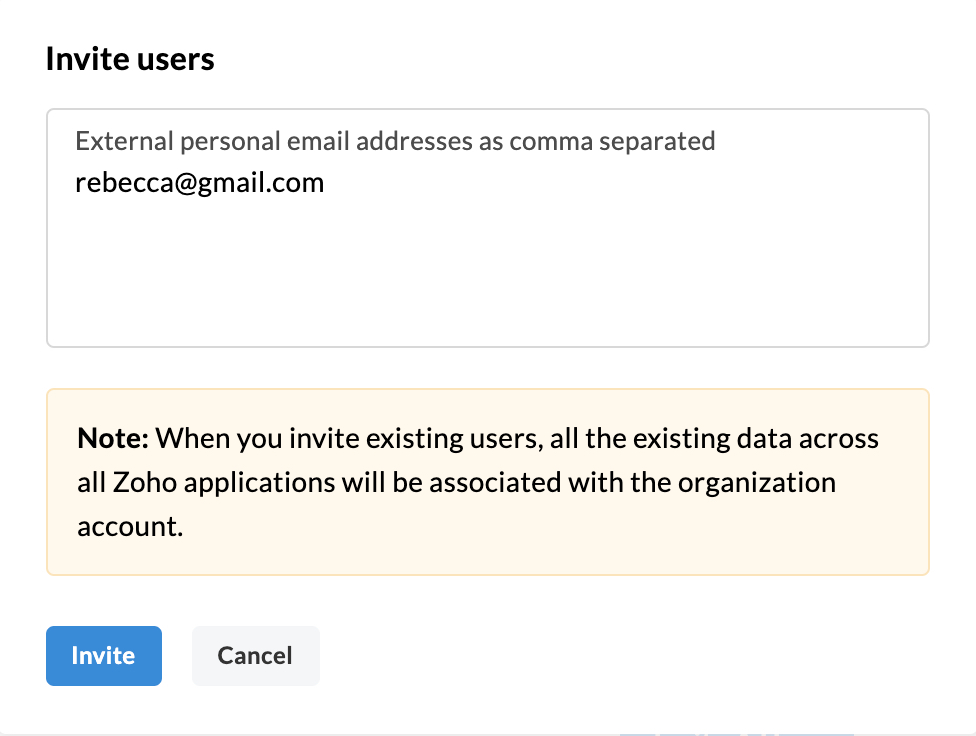
- In the Invitees page, click Invite A User or click Invite to continue.
- In the pop-up, enter the email address of the user you want to invite. If you want to invite multiple users in a single go, enter the email addresses with a separating comma.
- Once done, click Invite.
You can check the status of your invitation next to the invitee email address. You can also cancel or resent the invitation of a user by hovering on the respective invitee and clicking the Delete or Resend icons.

In case you want to resend the invitation to multiple invitees or delete invitations of multiple invitees, you can use the checkbox to select the users and then click Resend or Delete.

Import using CSV file
You can import as many as 200 users at a single time using the Comma-Separated Value (CSV) file. You can create a CSV file using any spreadsheet app like Zoho Sheets or Microsoft Excel. Create a spreadsheet and export it as a "Comma-separated values" file. You can download the sample file here.
Note:
The option to Import Users using a .CSV file will only be available for organizations with a paid plan.
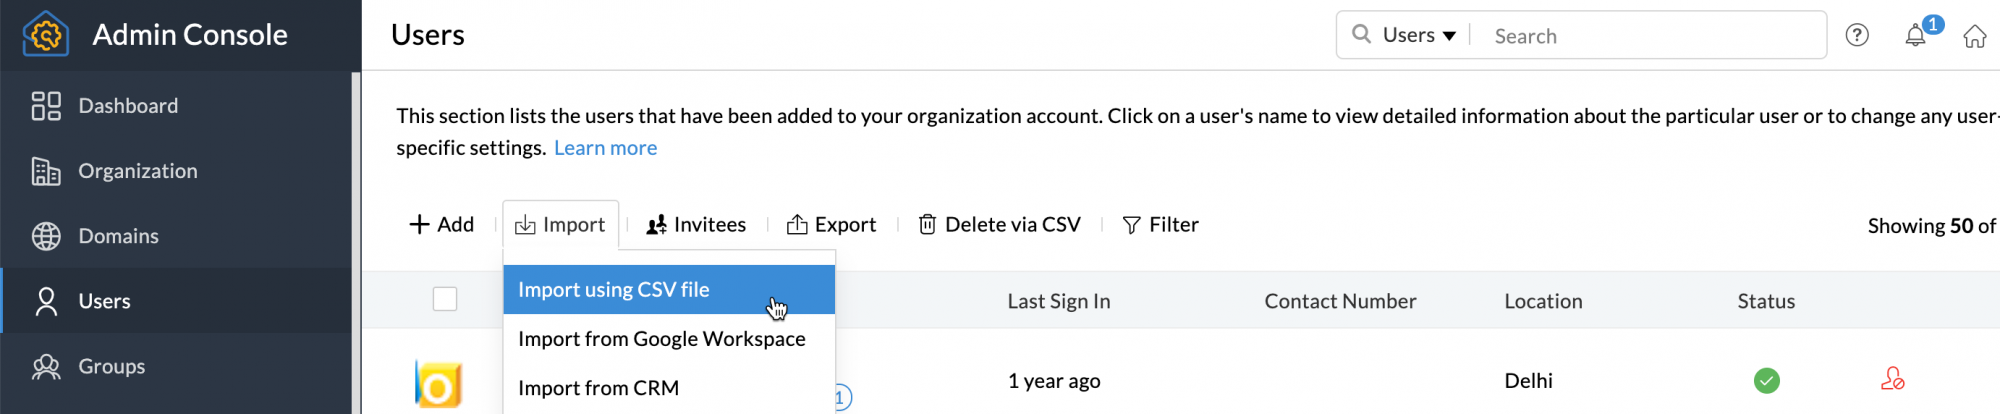
- Login to Zoho Mail Admin Console
- Navigate toUsers in the left pane.
- In the user listing page, clickImport using CSV file
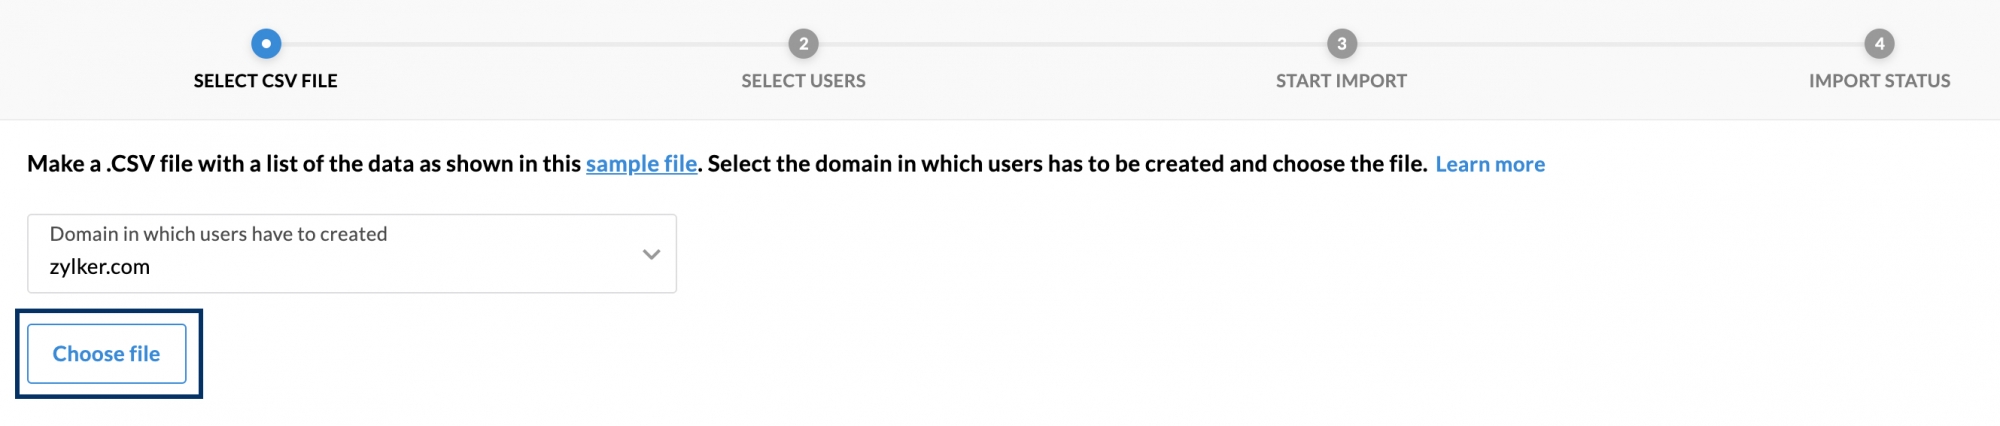
- You will be taken to the CSV import page. Click Start Importor Import.
- Choose the domain you want the users in the CSV file to be associate with from the drop-down.
- Click Choose fileto upload the CSV file with user details.
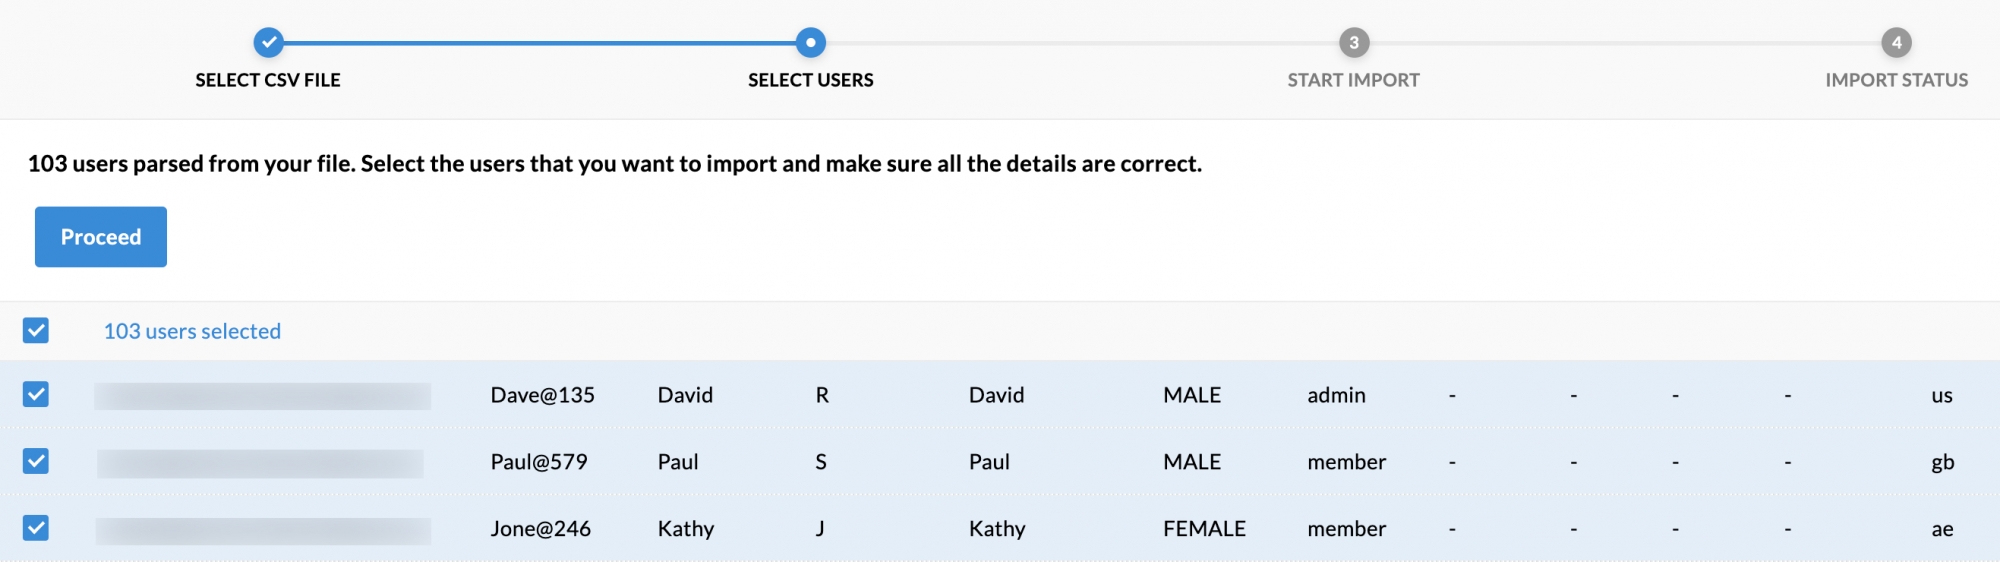
- All the users listed in your CSV file will be displayed for you to further scrutinize the users you want to add to your organization. You can choose to import all or only select users depending on your requirement.
- After choosing the users, click Proceed.
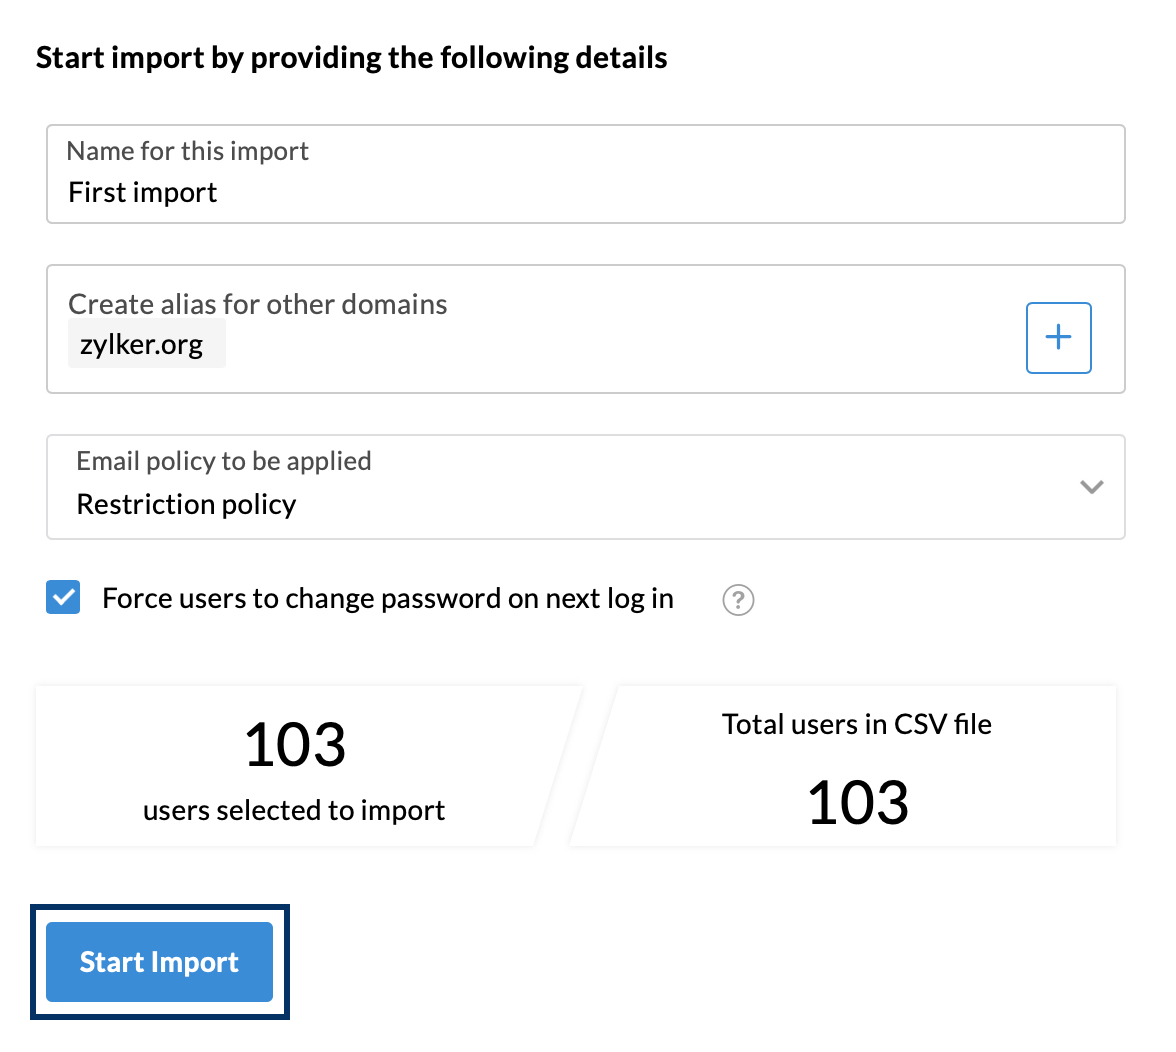
- In the Start Import page,Name your import for future references.
- You can also create an alias address for all users with any other domain you have added to your organization. To create a domain alias for all users, in the Create alias for other domains column, click theicon.
- Choose the Email policy you want to apply to all selected users from the drop-down.
- You can also force users to change the password you set during their first login attempt by checking that option.
- After configuring your import preferences, click Start Import.
The import status on success and failure of user upload will be displayed. If the import status does not refresh automatically, you can click the refresh icon. You can start using other parts of the Admin Console and access the import status in the Import using CSV file page.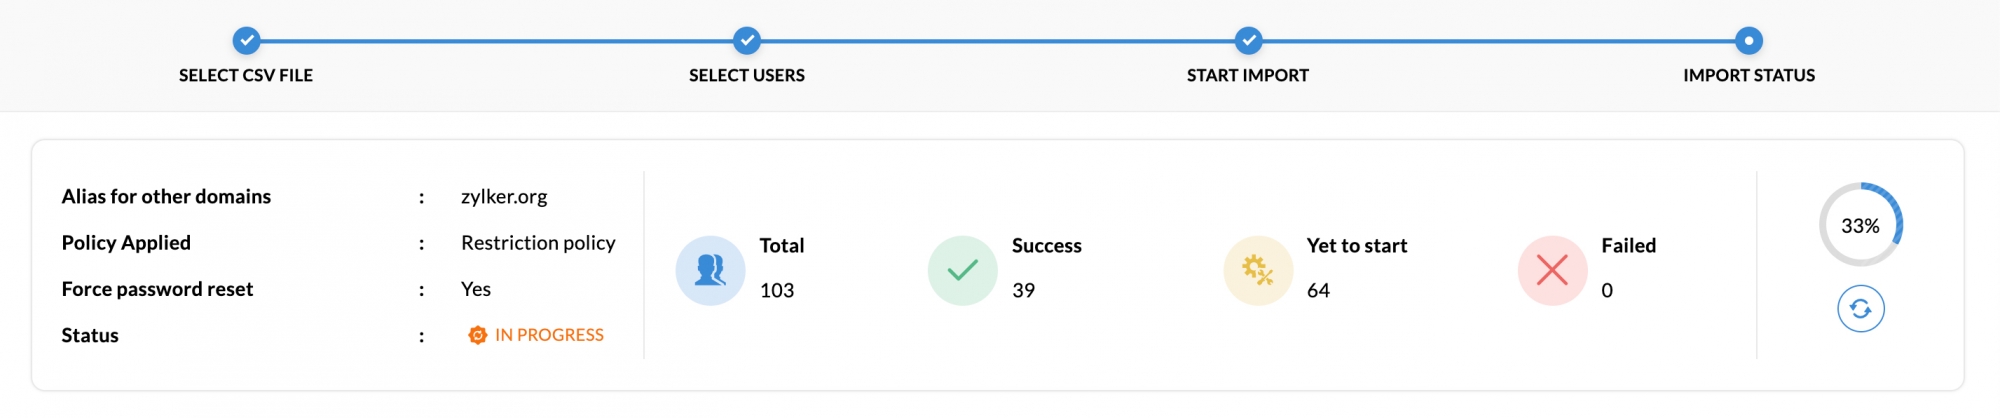
Import from Google Workspace
Note:
- The Import Users from Google Workspace feature is available only for organizations with a paid plan.
- The Google Workspace authorization is a one-time process, and it does not have to be repeated if it has already been done.
- Login to Zoho Mail Admin Console
- Navigate toUsers in the left pane.
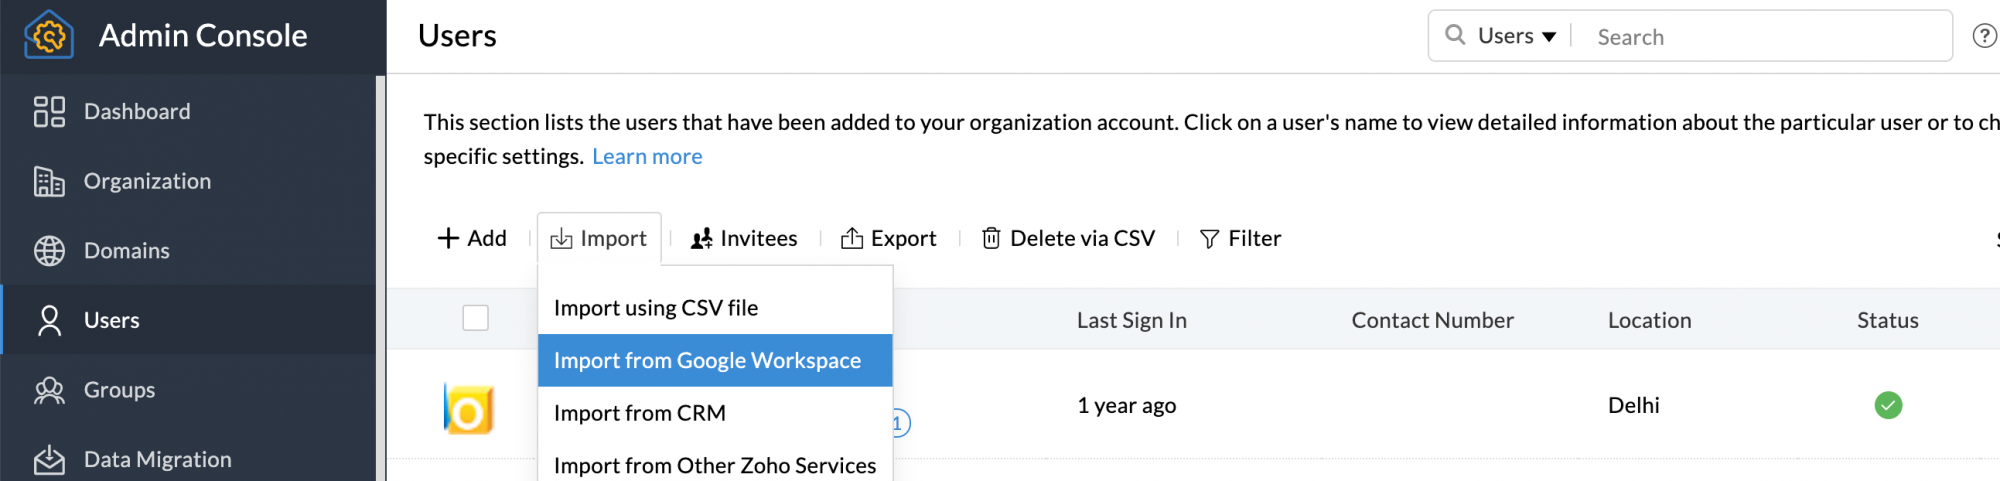
- In the user listing page, click Import and choose theImport from G oogle Workspaceoption.
- If you have not authenticated your Zoho Mail account to access Google Workspace, follow the below steps:
- Sign in to your Google Workspace admin account, and follow the authentication details as given in the help page link.
- Once the authentication is done, enter theGoogle Workspace super admin email address and theservice account email address in the respective fields. Upload the file that was downloaded onto your system in theproduct key file field, and click Authenticate.

- If you have already authenticated your Google Workspace account with Zoho Mail, you will see the Import Users page. Click theMigrate button.
- The Google Workspace account that has been authenticated with Zoho Mail will be displayed. ClickProceed.
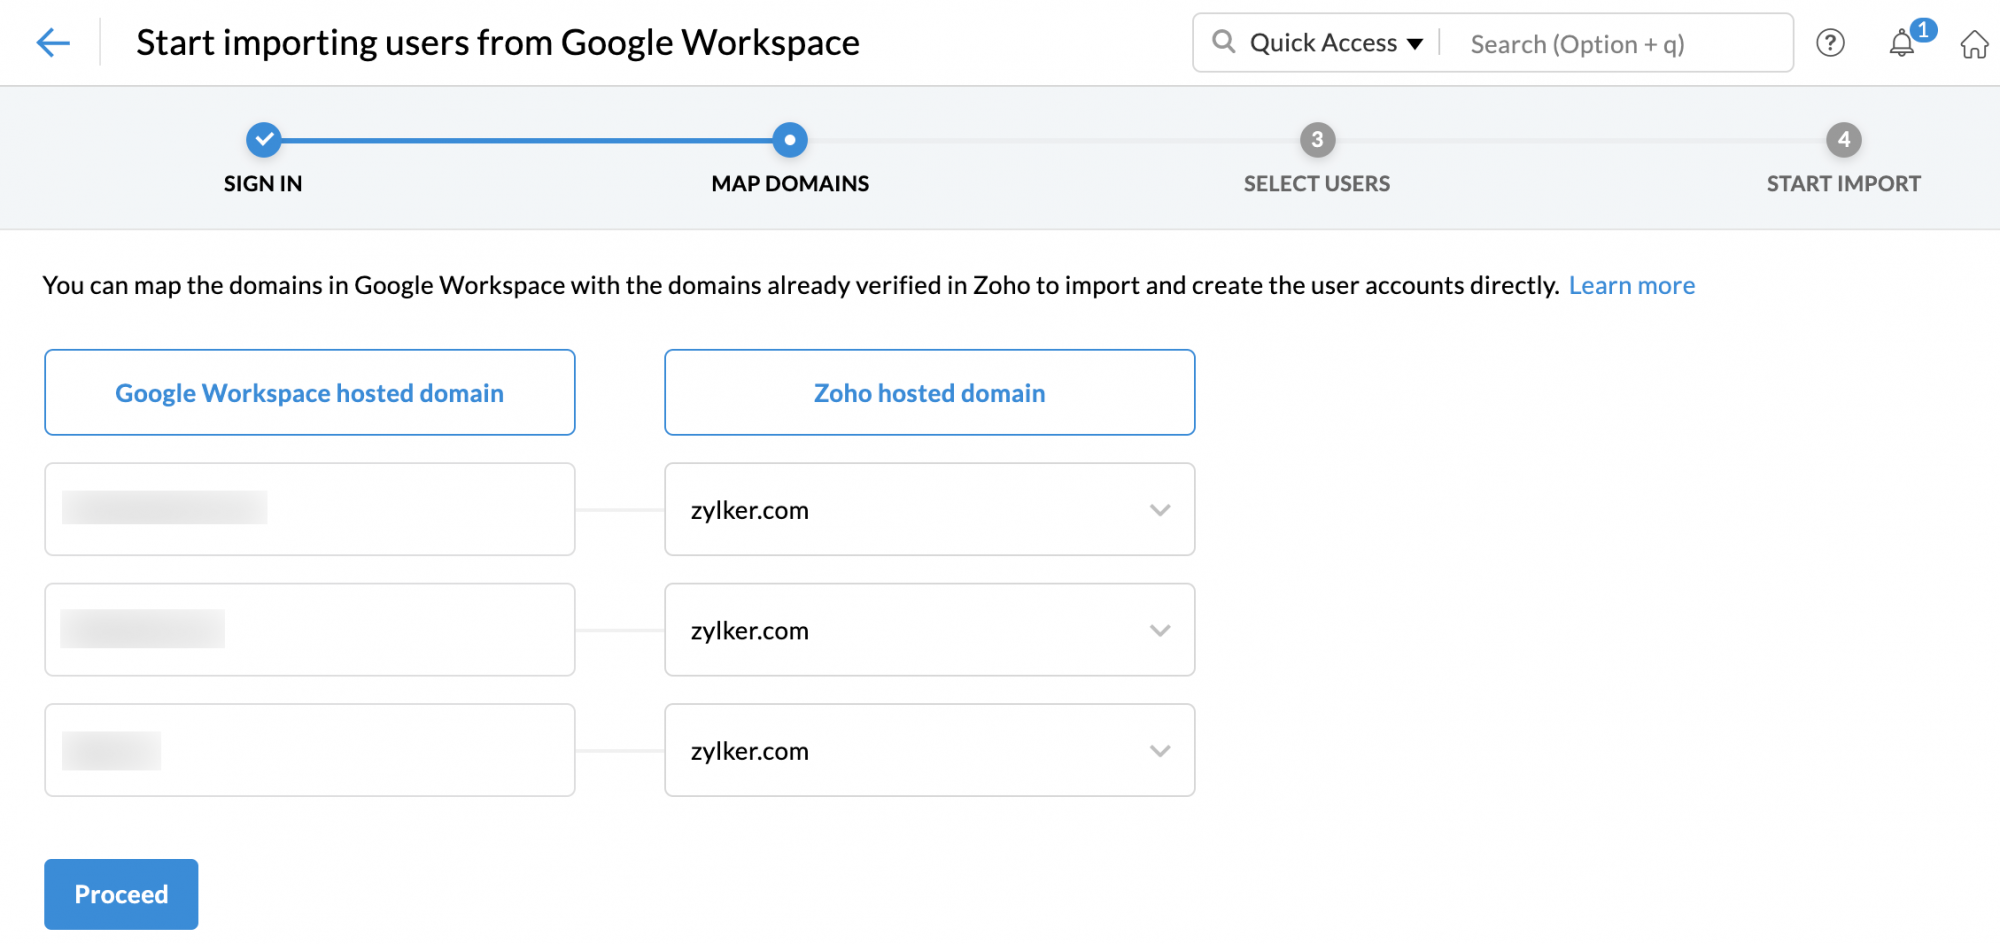
- If you have multiple domains configured, you'll be asked to choose the respective destination domains, where the users need to be created.
- After selecting the destination domains, clickProceed.
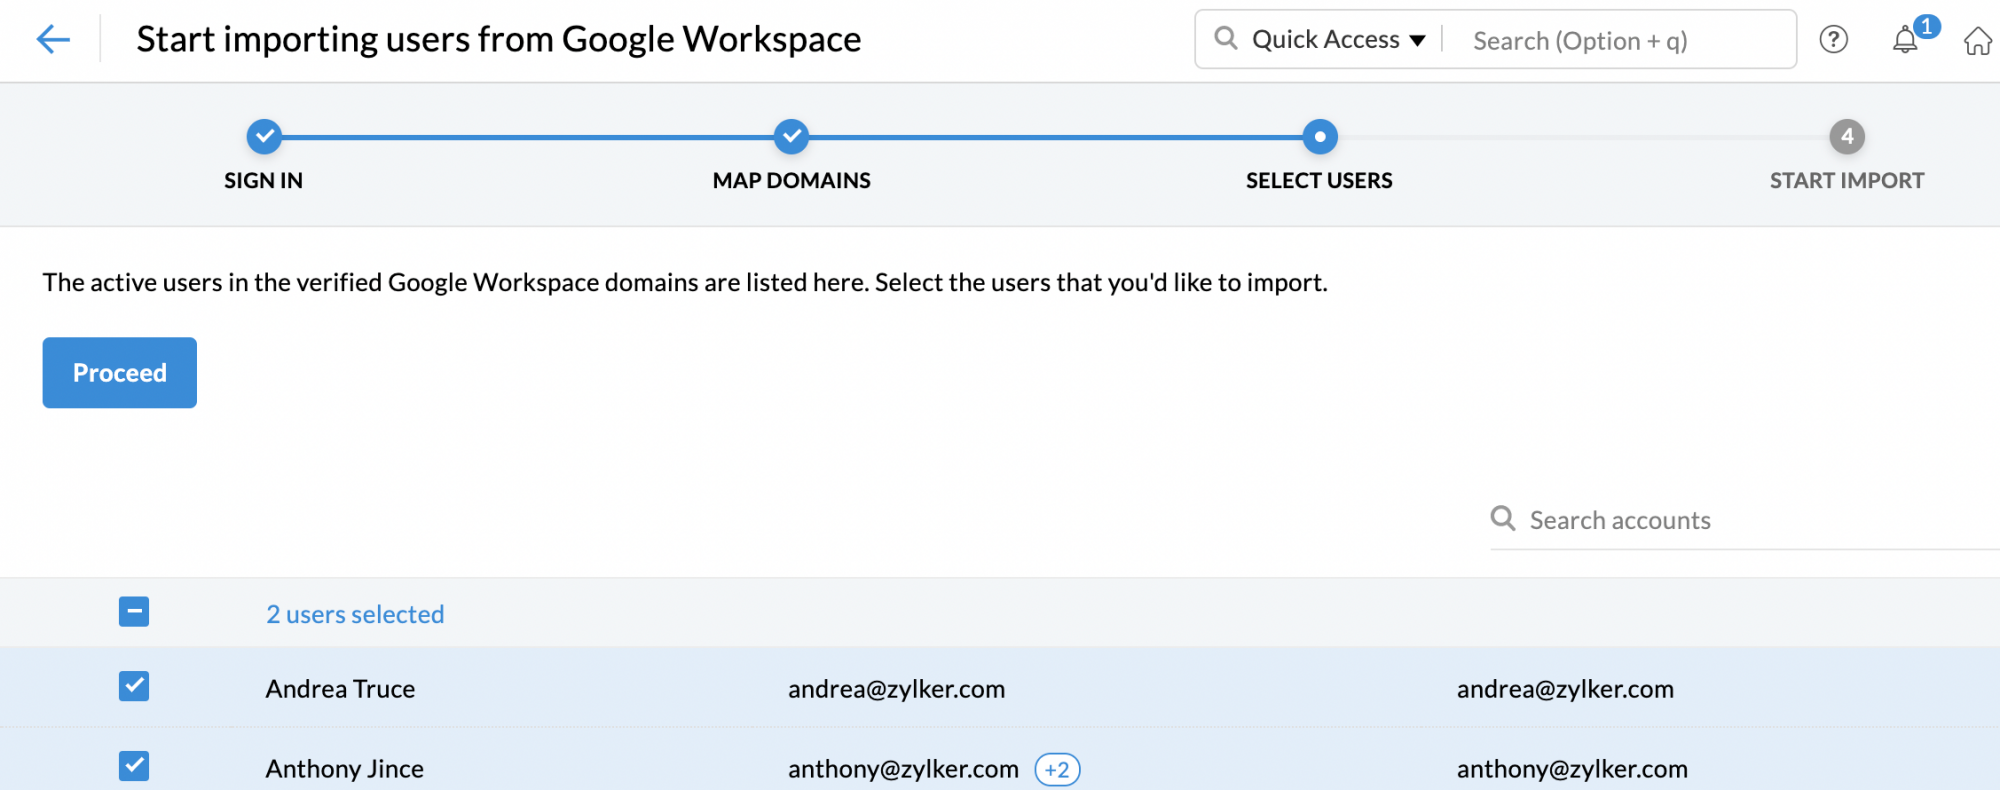
- All the users in your Google Workspace account will be listed. Select the checkboxes respective to the users that you would like to create in Zoho Mail, and clickProceed.
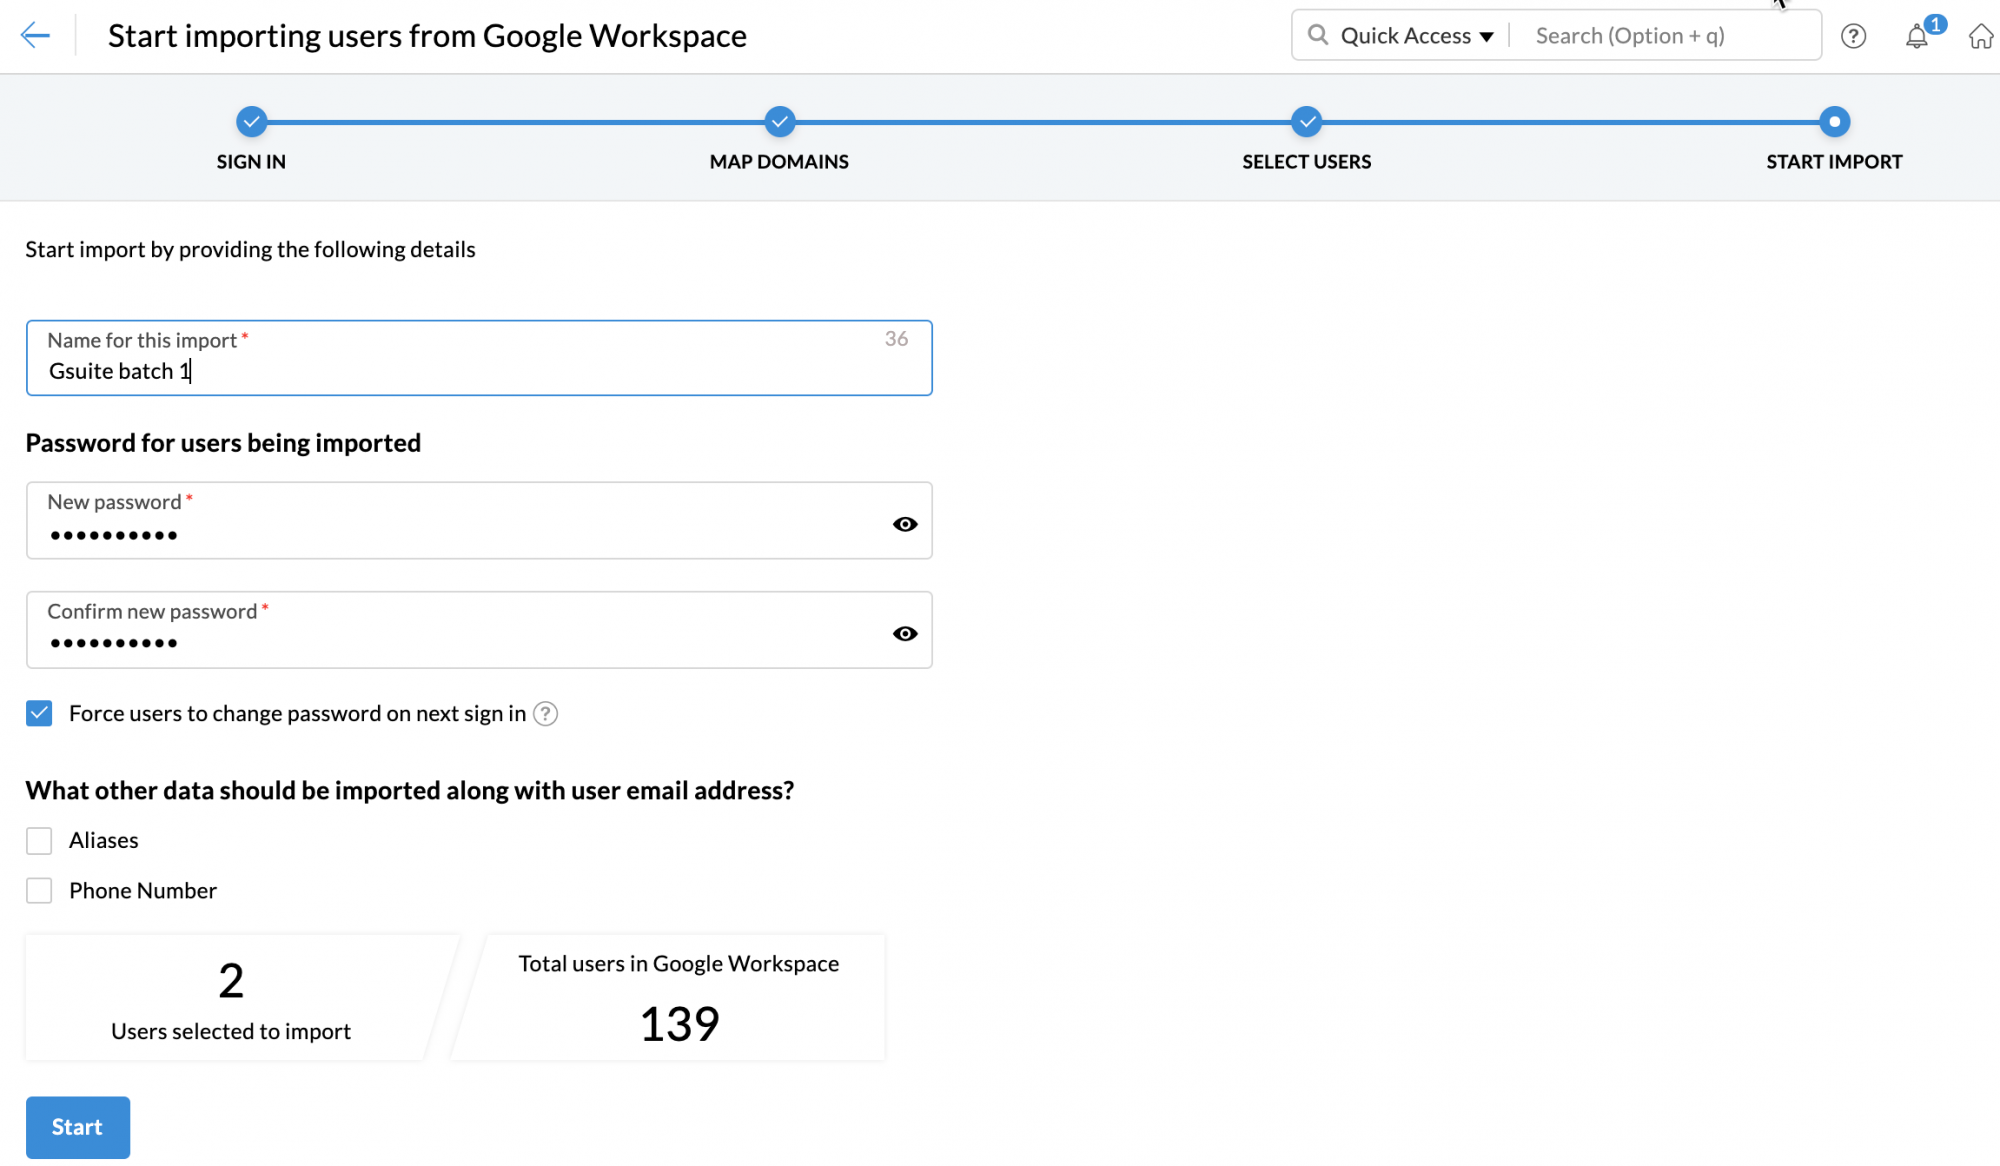
- Enter a name for the Import, for your reference.
- Enter a password for the users that you're importing.
- Select whether you want to force users to change their passwords during their first log in (recommended).
- Select whether you want to import user aliases and phone numbers, and click Start.
- You can continuously monitor the progress of the import from the Overview section
Bring CRM users to Zoho Mail
If your Organization has a Zoho CRM account or if you are a Zoho CRM Administrator and want to set up mail hosting for the entire domain, you can directly associate the users you already have in Zoho CRM with Zoho Mail Suite, using the 'Import from CRM' option. This option is particularly useful when you are already a Zoho CRM user but was hosting your emails with some other service provider.
Note:
- The Super Admin in CRM must either be an Admin or Super Admin in Zoho Mail to use this feature.
- You can only import users from Zoho CRM if the users' email address is based on the same domain added to Zoho Mail.
- Login to Zoho Mail Admin Console
- Navigate toUsers in the left pane.
- In the user listing page, clickImport from CRM
- You will be taken to the CRM user import page. You can either Import or Invite users from Zoho CRM to Mail.
- Import - The users with their email address based on the same domain added to your Zoho Mail organization will be listed here.
- Invite - The users with their email address based on a different domain from what is configured to your Zoho Mail organization will be listed here.
To import users from CRM,
- In the CRM import page, click Import.
- The users who are part of Zoho CRM with the same domain email address as you configured in Zoho Mail will be listed here.
- Use the checkbox to select the users you want to import from CRM to Zoho Mail.
- Once done, click Import.
To invite users from CRM,
- In the CRM import page, clickInvite.
- The users who are part of Zoho CRM with a different domain email address as you configured in Zoho Mail will be listed in here.
- Use the checkbox to select the users you want to invite from CRM to Zoho Mail.
- Once done, click Invite.
These users will be sent an invitation link from Zoho Mail to join your organization. Once they accept the invitation, that user will be part of your organization.
If a CRM user who needs to be imported has already set up another organization, you will get an error. To avoid this, the user must log in to their account, and delete that organization in order to join yours. But if those users delete their accounts and not just the organization, their data will be lost.
Import from other Zoho services
If you are using other Zoho services like Zoho People, you can easily import users added in other products to Zoho Mail.
- Login to Zoho Mail Admin Console
- Navigate toUsers in the left pane.
- In the user listing page, clickImport from Other Zoho Services
- On the import page, all the users who are not yet part of Zoho Mail but are part of other Zoho services will be listed.
- ClickImport. Use the checkbox to select the users you want to import.
- ClickImport.
User Provisioning from Active Directory
Zoho Mail provides tools to discover and create corresponding users and email accounts in Zoho Mail, automatically.
- Install the Zoho Mail Active Directory User Provisioning Wizard in your system.
- When you execute the Wizard, you will be requested to provide the Super Admin credentials.
- You need to provide the Server in which the Active Directory is installed.
- You should have the details of the LDAP query to be used to list the users of the organization.
- You need to map the attributes of the Active Directory with the fields provided for Zoho Mail users.
- Based on the LDAP query and the attribute selection, the results will be displayed.
- After validating the results with your organization's user details, click 'Finish' to provision the users in Zoho Mail.
- You can request the LDAP tool for User Provisioning, by sending an email to support@zohomail.com with your organization details.
User Addition troubleshooting
While adding users to your organization, you might come across the following error:
AA101: Oops! Something went wrong. Try again later.
This error will occur when the email address you are trying to create already exists in your organization's account. You can use one of the following steps to resolve this issue;
- If you have access to the existing account with the same address as the one you are creating, you can login to Zoho Accounts using that email address and close the account.
- If you do not have access to the account
- Login to the Super Admin account of your organization and create a Catch-All account for the email address.
- After creating a catch-all account, log out from the Super Admin account.
- Navigate to Zoho Mail, enter the already existing email address and click Forgot password. You will receive the password reset link in the Catch-All account. You can reset the password using the link and close the account or accept an invitation to be added to the organization.
Deleting Users
In case you want to delete an existing user from your organization or bulk remove multiple users you can do so in multiple ways.
Delete users from user Listing
To delete a single user, you can hover over the respective user's name and click the delete icon.
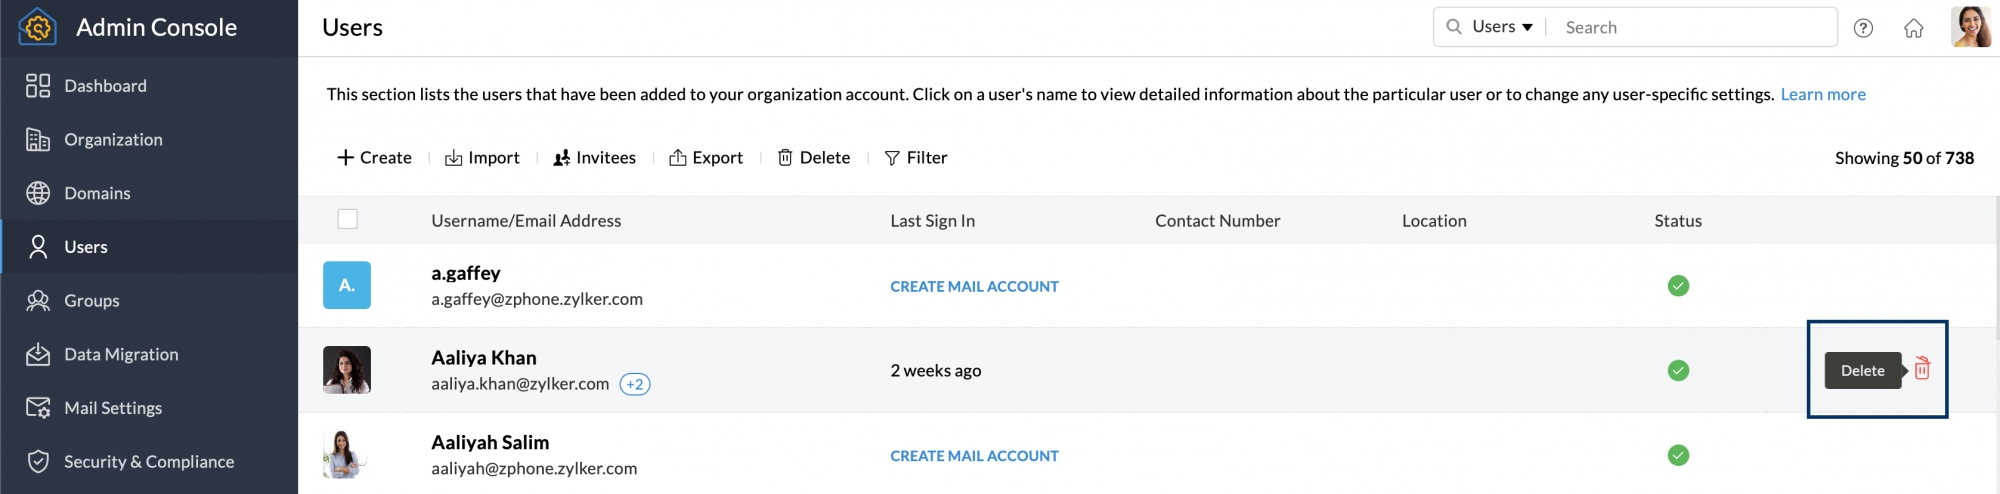
To delete a number of users from the user listing, select the users and then click the Delete button.
Bulk delete users via .CSV file
In case you want to do a clean-up of your organization's users and delete a number of users at once, you can do that with the help of a .CSV file. To delete users using a CSV file,
- Login to Zoho Mail Admin Console
- Navigate toUsers in the left pane.
- In the user listing page, click the Delete button and select Delete via CSV.
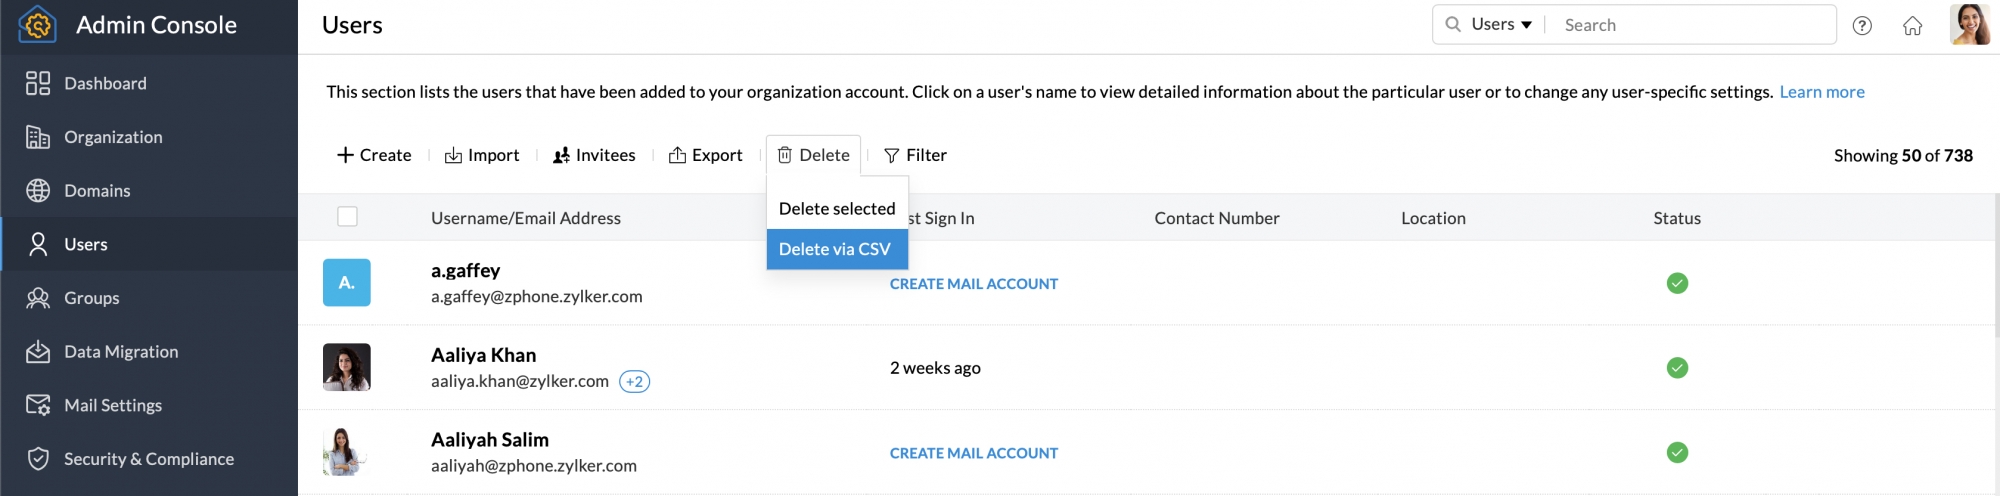
- In the pop-up window, upload your CSV file and then click Delete.
Note:
Deleting users via CSV option will be available only for organizations that are using one of our paid plans.
How Do I Add an Administrator to My Domain_6 Account
Source: https://www.zoho.com/mail/help/adminconsole/adding-users.html
0 Response to "How Do I Add an Administrator to My Domain_6 Account"
Post a Comment